Wednesday, February 27, 2013

Rami Kim workshop


I finished my Rami Kim bag.  Yeah.  I think it came out very well.  There are six different techniques that Rami showed us in the 2 day class.  She was such a wonderful teacher and so organized.  She actually covered all 6 techniques in one day.  This side shows the North American smocking, continuous prairie points and hexagon in a square.

This side shows the square in a square, prairie points and another type of smocking.  Magic.  Its funny how when you know the correct way to make something, it can make something that looks so hard, easy to do.

 This is a closeup of the north american smocking.  This was the hardest to make, but I think the best.  I used a Marcia Derse purple fabric that gave it some depth.

The leather handles really make the handbag look professional.  I chose a purple handles to match the bag. 

Thursday, October 4, 2012

Green Hexagons

 
The green hexagon quilt is finished.  It started with the leftover 2 inch squares.  Putting those together into 4 patches and then laying them out on the design wall in a pleasing pattern.
 Here is a close up of the free motion machine quilting.  I couldn't decide on 1 pattern, so I took the advice of Leah Day in her FMQ project and freehand drew different designs for the center hexagons.  What a fun project.
 I used the new marking pens that I got from Jill Schumackers web site.  One of my quilting thereapist friends was talking about how good they were at the last meeting and I had to try.  To get rid of the marking lines, I threw the quilt in the washing machine and soaked it.  The blue lines disappeared.
 This is the edge of the quilt with just straight line quilting.  I know that I have to improve my straight lines.  That was one of the comments that I received from a judge.  I think she said "Straight lines should be straight."  Criticism hurts, but she was right.  It's something I need to improve on.  These were done with a walking foot, so the tension on the quilt is pretty good.
I think I'm going to make another quilt with this pattern.  I enjoy making hexagons.  Before I start on the next quilt though, I've got to be sure to have good templates before I get too far.

Saturday, September 8, 2012

Barbara Shapel Workshop


 Congratulations to Ellen for getting Spin in Brown accepted into PIQF New Quilts of Northern California.  Her Orange Rhyme quilt was in last years PIQF and her quilting is amazing.

I recently took a workshop with Barbara Shapel who also does amazing threadwork.  I would have never thought I could make such a beautiful thread work, but she breaks it down into manageable steps.  This is what I completed after the 1 day Heron Moon class.


 Barbara was able to cover 4 different quilting stitches.  The background stitch used a Monopoly filament thread on top and a matching background polyester thread in the bobbin with a 60/8 needle.  It was just a back and forth stitch that she asked us to cross over the lines.  The caffein stitch (moon) used a zigzag stitch with 1.4 width and 1.3 length in a white rayon thread with a 70/10 jeans needle.  The beak used 3 different colors of yellow to orange with a fill stitch that was put in a hoop and stitched side to side.  The feather stitch was an undulating line that came to a point and went back up to the top.


This is the night side                                                                               This is the day side

It is a two sided quilt.  The back looks just as good as the front.  By putting the same color of thread in the bobbin, you are able to get the same thread work on the other side of your quilt.


I can't believe I finished this.  I learned a lot during the workshop.  Mabry told me my machine needed oil and told me how to put oil on a q tip to clean out the bobbin case.  Rachel showed me how she uses a tweezer to put the thread through the needle.  Especially those tiny 60/8 needles.  I could not find that needle at JoAnns fabrics and Cindi let me have one for class.  I had also never used spray basting to baste the 3 layers together and Diane showed me how to use it.  I gave Diane a quilt sandwich to practice her stitches on and I think I gave Cindi some of that magical moon thread.  The teacher was wonderful and full of thread knowledge, but all the students in the class helped each other.  Wow, I actually made this.

Saturday, August 4, 2012

4 patch

What do you do with the leftovers from the last project?  Create another.  After I sewed the 2 inch squares together into 4 patches, I laid them out on a white background in this configuration.

I have already cut up some shot cotton to go into the hexagon and triangle.  I like it.  What is so great about the shot cotton is just like batik and hand dyed fabric there is no right side.  The front and back look just as good, so it is hard to make mistakes.

I had to draft my own template. At first I cut it all out.  I found out as I started to sew that the hexagon template was a quarter inch too big all around.  So I had to resize all the hexagons.  Next time I draft my own templates, I'll sew a patch together to see if it fits.

I am almost finished sewing the top together.  In a way I wish I had more of the green Classic 2011 Kaffe charms to make this a bigger top, but I'll just use what I have and keep it small.

Wednesday, August 1, 2012

Basketweave 2


Basketweave 2 is finished.  After I finished Basketweave 1, there were some nagging questions about this pattern that I wanted to explore.  What if I used stripe fabric to show off the weave effect more?  What if I use Kaffe Fassett fabric for the background?  So instead of the busy Kaffe fabric as the weave, I swapped it to the background.  

 I used 2 packets of 6 " charm fabric for the background.  They were the Kaffe Classic green 2011 charms, that I got at the Voices in Cloth show in March.  Because I used this charm fabric, instead of a jelly roll at 2.5 inches, everything is cut at 2 " squares and strips.  Each 6 " charm was cut into 9 pieces.
 Here is a closeup of the shot cotton border.  I used a freezer paper template to free motion quilt the feathers.  I used a 30 wt variegated thread that Betsy helped me to find.  Pretty.
There were some dots fabric and fabric that looked like spider webs.  It was fun pulling all the Kaffe fabric that I have been collecting over the years and finally using it.  I can appreciate the shot cotton fabric that has one color in the weft and a different color in the warp.  The Kaffe Stripes took it to another level of alternating the color in the weft to the same and a different color to make the stripes.  Did I mention that I love Kaffe fabric.  It is expensive.  I didn't have a project in mind when  I bought all this stripe fabric years ago, but I knew that I whatever I put it in, I would be happy with it.

I had a lot of leftover squares and scraps of the stripe fabric.  I started making 4 patches with the squares an cut the stripe fabric into hexagons.  More in my next post...

Wednesday, June 27, 2012

Basketweave


Basketweave quilt is finished.  I used 1 roll each of classic red and blue Kaffe Fassett 2 1/2 strips along with my own hand dyed fabric.  I was lucky to purchase the Kaffe fabric at our Voices in Cloth show earlier this year in March.  In an earlier post, you can see how it was constructed.  Very free form.  For instance, I took the first strip that was cut into 2.5 x 6.5 inches and pieced them together with my 2.5 x 2.5 squares.  Then I worked on the next strip.  After I used up all the blue roll, I worked on the red roll.

 The Kaffe fabrics are such a joy to work with.  The colors and free form just interplay so well with each other.  At first I thought oh the dot fabric would detract and stand out too much,  there are 4 dot fabrics, but can you spot them from 10 feet away?  no.  Somehow the busy weave (positive space) makes the calming plain (negative space) work well with each other.
 This is a close up view.  I was hoping to capture the metallic thread I used in the quilting.  There is an Amy Butler fabric on the back.   I put Glitter Metallic thread in the bobbin case and free hand stitched the flowers from the Amy butler fabric.  It sparkles.
This is going to be a wedding gift for a good friend who we've known for over 30 years.  This is his first marriage.  He is so calming and reserved and she is so energetic and positive.  Perfect for each other.  Who would have thought?

Ann Horton Workshop


I took a one day workshop Monday with Ann Horton on designing quilts with textured embellishments.  It is too bad that it was only one day, because there was a lot of information in the class.  Thread painting, digitized embroidery and textile applique ....they all sound so intimidating, but like anything else once you try it, it can be fun.  

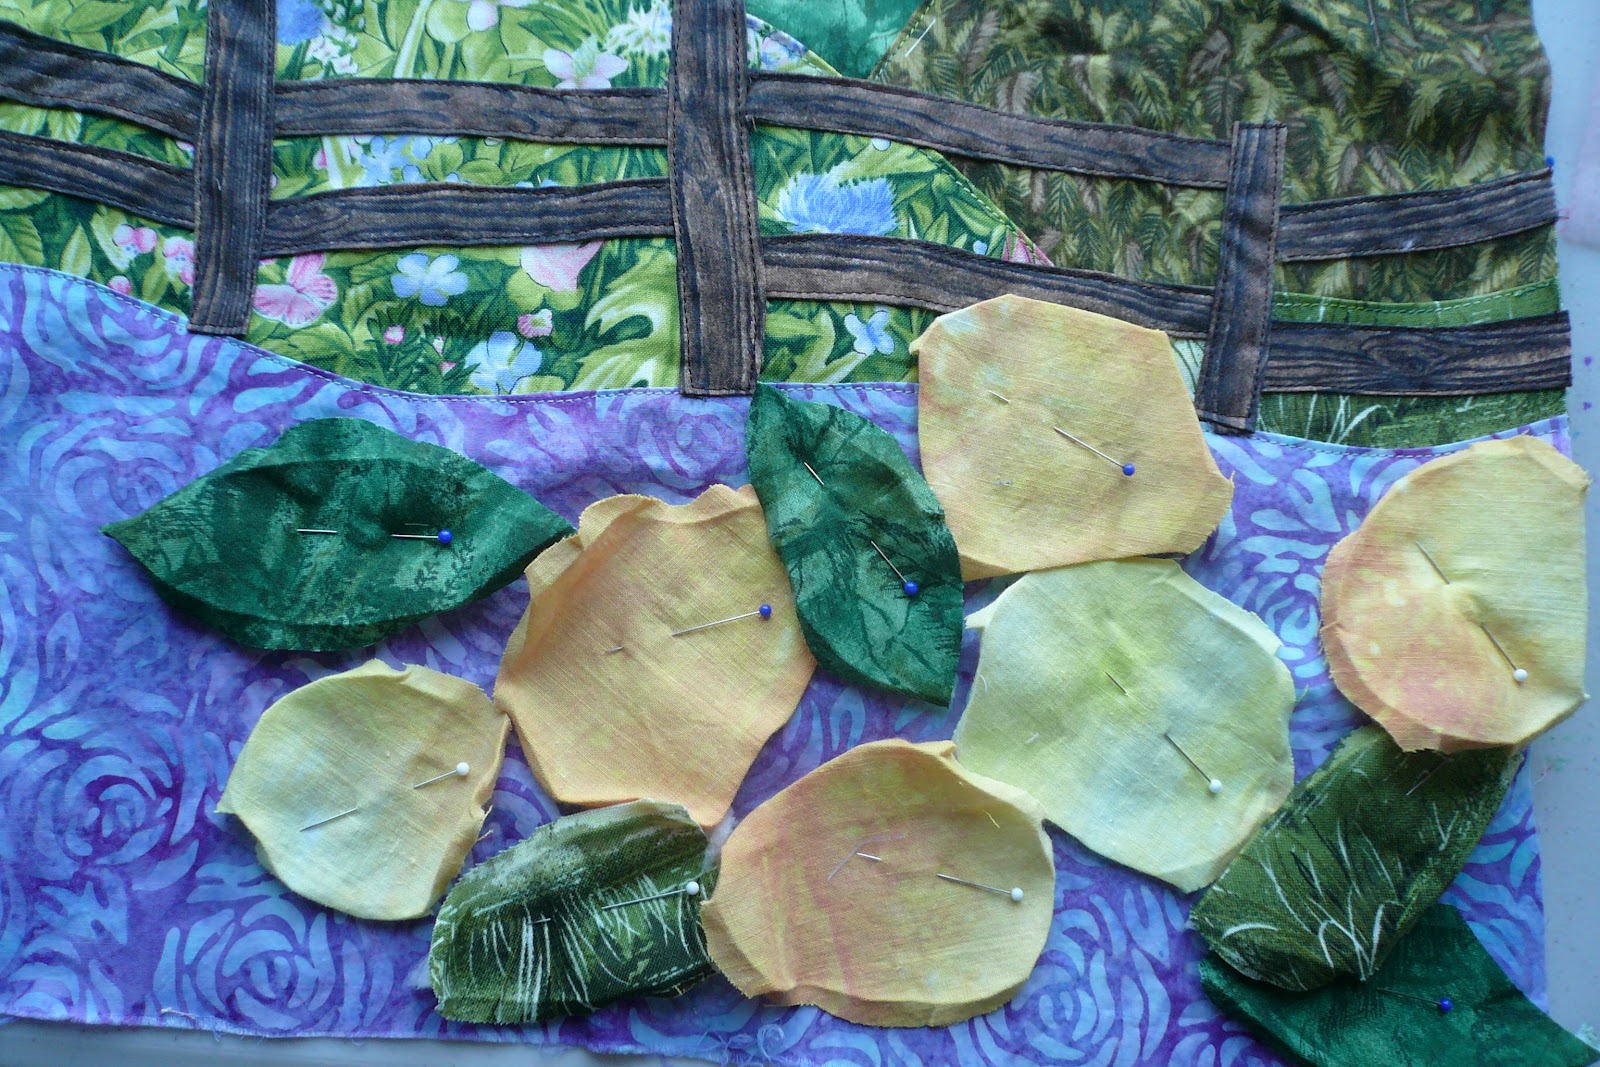
 This is a picture of what I accomplished in one day.  We drew out our picture first on paper, then free hand cut out our images with a scissors.  For the hills and fence posts, I turned the edges under a quarter inch with an iron.  Then I sewed it in place using my general foot.  Do you see the negative and positive space created by the fence posts?
 I changed my general foot to the free motion foot to make this butterfly.  We used tear away stabilizer, drew a butterfly on it and then placed a piece of organza on top of the drawing, then hooped it all.  I used three different colors on this butterfly yellow, golden and brown.  I haven't done it yet, but she said to tear away the stabilizer, cut the organza and place the butterfly on your quilt.
At the top left of the top is a cut out bird from fabric that Suzi let me have.  Thank you Suzi.  On that last hour of class, Ann was showing us how to stitch the bird.  Her sample quilt had grapes and a bird on a branch.  She changed about 8 different color threads in her demonstration.  Shading, outlining, choosing color to make the bird and grapes just pop out at you.  The master at work.  She has hours and hours of experience at doing this and made it look so easy.  I wish.  Another technique she showed us was to stuff the flowers and leaves with a little bit of stuffing and applique it on.  Haven't gotten to that part yet.

I am going to try and finish the flowers, finish the butterfly, finish the bird and not worry about how great or not so great it looks.  Try the new techniques.  Wow I actually made a butterfly.